丁香实验_LOGO
登录
提问
我要登录
|免费注册
点赞
收藏
wx-share
分享

Reprogramming Fibroblasts with the CytoTune-iPS Reprogramming Kit

互联网

3753

实验试剂


1. CytoTune™ Sendai Reprogramming Vectors

Note: For successful reprogramming, you need all four reprogramming vectors.

2. Human neonatal foreskin fibroblast cells to reprogram

3. Gibco® Mouse Embryonic Fibroblasts (Irradiated)

4. DMEM with GlutaMAX™-I (High Glucose)

5. KnockOut™ DMEM/F-12

6. Fetal Bovine Serum (FBS), ES Cell-Qualified

7. KnockOut™ Serum Replacement (KSR)

8. MEM Non-Essential Amino Acids (NEAA)

9. GlutaMAX™-I Supplement

10. Basic FGF, Recombinant Human

11. β-Mercaptoethanol, 1000X

12. Penicillin-Streptomycin, Liquid

13. Attachment Factor

14. TrypLE™ Select Cell Dissociation Reagent or 0.05% Trypsin/EDTA

15. DPBS Without Calcium or Magnesium

16. TRIzol® LS Reagent

17. SuperScript® VILO™ cDNA Synthesis Kit

18. AccuPrime™ SuperMix I

19. Mouse Anti-Tra1-60 Antibody

20. Mouse Anti-Tra1-81 Antibody

21. Mouse Anti-SSEA4 Antibody

22. Rabbit Anti-SeV Antibody

23. Alexa Fluor® 488 Goat Anti-Mouse IgG (H L) Antibody

24. Alexa Fluor® 594 Goat Anti-Mouse IgG (H L) Antibody

25. Alexa Fluor® 488 Goat Anti-Rabbit IgG (H L) Antibody

26. Alexa Fluor® 594 Goat Anti-Rabbit IgG (H L) Antibody 

实验设备


1. Sterile cell culture hood (i.e., biosafety cabinet) equipped with a stereo microscope

2. Inverted microscope

3. Incubator set at 37°C, 5% CO2

4. Water bath set at 37°C

5. Sterile serological pipettes (5-mL, 10-mL)

6. Centrifuge

7. 15-mL centrifuge tubes

8. 60-mm and 100-mm tissue culture-treated dishes

9. 6-well tissue culture-treated plates

10. 25-gauge 1½-inch needle

实验步骤


1. Preparing MEF dishes

1) Gelatin coating culture vessels

          a. 1. Cover the whole surface of each new culture vessel with Attachment Factor (AF) solution and incubate the vessels for 30 minutes at 37°C or for 1 hour at room temperature.

          b. Using sterile technique in a laminar flow culture hood, completely remove the AF solution from the culture vessel by aspiration just prior to use. Coated vessels may be used immediately or stored at room temperature wrapped in Parafilm® sealing film for up to 24 hours.

Note: It is not necessary to wash the culture surface before adding cells or medium.

2) Thawing Gibco® MEFs (Irradiated)

          a. Remove the cryovial containing inactivated MEFs from the liquid nitrogen storage tank.

          b. Briefly roll the vial between hands to remove frost, and swirl it gently in a 37°C water bath.

          c. When only a small ice crystal remains in the vial, remove it from water bath. Spray the outside of the vial with 70% ethanol before placing it in the cell culture hood.

          d. Pipet the thawed cells gently into a 15-mL conical tube.

          e. Rinse the cryovial with 1 mL of pre-warmed MEF medium. Transfer the medium to the same 15-mL tube containing the cells.

          f. Add 4 mL of pre-warmed MEF medium dropwise to the cells. Gently mix by pipetting up and down.

Note: Adding the medium slowly helps the cells to avoid osmotic shock.

         g. Centrifuge the cells at 200 × g for 5 minutes.

         h. Aspirate the supernatant and resuspend the cell pellet in 5 mL of pre-warmed MEF medium.

          i. Remove 20 μL of the cell suspension and determine the viable cell count using your method of choice (e.g., Countess® Automated Cell Counter).

3) Plating MEFs

         a. Centrifuge the remaining cell suspension (step 9, Thawing Gibco® MEFs) at 200 × g for 5 minutes at room temperature.

         b. Aspirate the supernatant. Resuspend the cell pellet in MEF medium to a density of 2.5 × 10⁶ cells/mL.

         c. Aspirate the gelatin solution from the gelatin coated culture vessel.

         d. Add the appropriate amount of MEF medium into each culture vessel.

         e. Into each of these culture vessels, add the appropriate amount of MEF suspension.

         f. Note: The recommended plating density for Gibco® Mouse Embryonic Fibroblasts (Irradiated) is 2.5 × 10⁴ cells/cm2 .

         g. Move the culture vessels in several quick back-and-forth and side-to-side motions to disperse the cells across the surface of the vessels.

         h. Incubate the cells in a 37°C incubator with a humidified atmosphere of 5% CO2 .

         i. Use the MEF culture vessels within 3–4 days after plating.

2. Reprogramming Fibroblasts

1) Day –2: Prepare the cells for transduction

        a. 2 days before transduction, plate human neonatal foreskin fibroblast cells into two wells of a 6-well plate at the appropriate density to achieve 5 × 10⁵ cells per well on the day of transduction (Day 0).

Note: We recommend about 80–90% confluency on the day of transduction. Because overconfluency results in decreased transduction efficiency, we recommend replating your cells to achieve 80–90% confluency if your cells have become overconfluent during culturing.

        b. Culture the cells for two more days, ensuring the cells have fully adhered and extended.

2) Day 0: Perform transduction

        c. On the day of transduction, warm 2 mL of fibroblast medium in a water bath

        d. Remove one set of CytoTune™ Sendai tubes from the –80°C storage. Thaw each tube one at a time by first immersing the bottom of the tube in a 37°C water bath for 5–10 seconds, and then removing the tube from the water bath and allowing it to thaw at room temperature. Once thawed, briefly centrifuge the tube and place it immediately on ice.

        e. Add the indicated volumes of each of the four CytoTune™ Sendai tubes (3 × 10⁶ CIU each; see the CoA for the appropriate volume) to 2 mL of fibroblast medium, pre-warmed to 37°C. Ensure that the solution is thoroughly mixed by pipetting the mixture gently up and down. Complete the next step within 5 minutes.

        f. Aspirate the fibroblast medium from the cells, and add one half of the solution prepared in Step 5 to each of the two wells. Place the cells in a 37°C, 5% CO2 incubator and incubate overnight.

3) Day 1: Replace medium and culture cells

        a. 24 hours after transduction, replace the medium with fresh fibroblast medium.

        b. Note: Depending on your cell type, you should expect to see some cytotoxicity 24–48 hours post-transduction, which can affect >50% of your cells. This is an indication of high uptake of the virus. We recommend that you continue culturing your cells and proceed with the protocol.

        c. Culture the cells for 6 more days, changing the spent medium with fresh fibroblast medium every other day.

Note: Depending on your cell type, you may observe high cell density before Day 5. We do not recommend passaging your cells onto MEF culture dishes before 7 days post-transduction.

4) Day 5 or 6: Prepare MEF culture dishes

One to two days before passaging the transduced fibroblasts onto MEF feeder-cells, prepare 100-mm MEF culture dishes.

5) Day 7: Plate transduced cells on MEF culture dishes

        a. Seven days after transduction (Step 6), fibroblast cells are ready to be harvested and plated on MEF culture dishes. Remove the medium from the fibroblasts, and wash cells once with DPBS.

        b. To remove the cells from the 6-well plate, use 0.5 mL of TrypLE™ Select reagent or 0.05% trypsin/EDTA following the procedure recommended by the manufacturer and incubate at room temperature. When the cells have rounded up (1–3 minutes later), add 2 mL of fibroblast medium into each well, and collect the cells in a 15-mL conical centrifuge tube.

Note: Because the cells can be very sensitive to trypsin at this point, minimize trypsin exposure time and incubate the cells at room temperature.

        c. Centrifuge the cells at 200 × g for 4 minutes, aspirate the medium, and re-suspend the cells in an appropriate amount of fibroblast medium.

        d. Count the cells using the desired method (e.g., Countess® Automated Cell Counter), and seed the MEF culture dishes with 5 × 10⁴ –2 × 10⁵ cells per 100-mm dish and incubate at 37°C, 5% CO2 incubator overnight.

        e. Note: We recommend plating 5 × 10⁴ , 1 × 10⁵ , and 2 × 10⁵ cells per 100-mm dish. Depending on your cell type, you may need to plate most of your cells on the same plate to ensure sufficient numbers of colonies.

Note: Set aside any remaining cells for RNA extraction to be used as a positive control in the RT-PCR detection of the SeV genome.

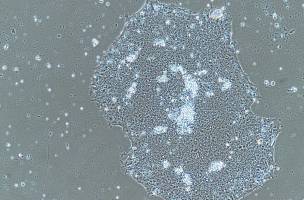
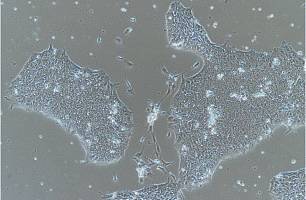
6) Day 8 to 28: Feed and monitor the cells

        a. 24 hours later, change the medium to iPSC medium, and replace the spent medium everyday thereafter.

        b. Starting on Day 8, observe the plates every other day under a microscope for the emergence of cell clumps indicative of transformed cells.

Note: For BJ fibroblasts, we normally observe colony formation on Day 12 post-transduction. However, depending on your cell type, you may need to culture for up to 4 weeks before seeing colonies.

        c. Three to four weeks after transduction, colonies should have grown to an appropriate size for transfer. The day before transferring the colonies, prepare MEF culture plates using Attachment Factor-coated 12- or 24-well plates.

Note: We typically harvest colonies closer to three weeks to avoid differentiation.

        d. When colonies are ready for transfer, perform live staining using Tra1-60 or Tra1-81 for selecting reprogrammed colonies.

        e. Manually pick colonies and transfer them onto prepared MEF plates.

3. Identifying iPSC Colonies

 By Day 21 post-transduction, the cell colonies on the MEF culture dishes will have become large and compact, covering the majority of the surface area of the culture dish. However, only a fraction of these colonies will consist of iPSCs, which exhibit a hESC-like morphology characterized by a flatter cobblestone-like appearance with individual cells clearly demarcated from each other in the colonies. Therefore, we recommend that you perform live staining with Tra1-60 or Tra1-81 antibodies that recognize undifferentiated hESCs.

Note: Although colonies of “transformed” cells may emerge as early as 7 days after transduction, most of these colonies will not be correctly “reprogrammed” cells. iPSCs usually emerge a little later (around day 14 posttranduction), resemble embryonic stem cells in morphology, and express the cell surface markers Tra1-60 and Tra1-81.

4. Live Staining with Antibodies

1) Aspirate the medium from the reprogramming dish.

2) Wash the cells once with 1X KnockOut™ DMEM/F-12.

3) Add the diluted primary antibody to the cells (6 mL per 100-mm dish).

4) Incubate the primary antibody and the cells at 37°C for 60 minutes.

5) Remove the primary antibody solution from the dish.

Note: The primary antibody solution can be stored at 4°C for 1 week and re-used up to 2 times.

6) Wash cells three times with KnockOut™ DMEM/F-12.

7) Add the diluted secondary antibody to the cells (6 mL per 100-mm dish).

8) Incubate the secondary antibody and the cells at 37°C for 60 minutes.

9) Remove the secondary antibody solution from the dish.

Note: The secondary antibody solution can be stored at 4°C for 1 week and re-used up to 2 times.

10) Wash cells three times with KnockOut™ DMEM/F-12 and add fresh KnockOut™ DMEM/F-12 to cover the surface of the cells (6 mL per 100-mm dish).

11) Visualize the cells under a standard fluorescent microscope and mark the successfully reprogrammed colonies for picking and expansion. Successful antibody staining can very specifically distinguish reprogrammed colonies from just plain transformed counterparts, and can be detected for up to 24–36 hours. This is particularly useful because it helps identifying and tracking of candidate iPS colonies before picking and the day after they are transferred into a new culture dish for expansion.

5. Picking iPSC colonies

1) Place the culture dish containing the reprogrammed cells under an inverted microscope and examine the colonies under 10X magnification.

2) Mark the colony to be picked on the bottom of the culture dish.

Note: We recommend picking at least 10 distinct colonies by the end of each reprogramming experiment and expanding them in separate 24-well MEF culture plates (see below).

3) Transfer the culture dish to a sterile cell culture hood (i.e., biosafety cabinet) equipped with a stereomicroscope.

4) Using a 25-gauge 1½-inch needle, cut the colony to be picked into 5–6 pieces in a grid-like pattern.

5) Using a 200 μL pipette, transfer the cut pieces to a freshly prepared 24-well MEF culture plate containing human iPSC medium.

6) Incubate the MEF culture plate containing the picked colonies in a 37°C incubator with a humidified atmosphere of 5% CO2 .

7) Allow the colonies to attach to the culture plate for 48 hours before replacing the spent medium with fresh human iPSC medium. After that, change the medium every day.

8) Treat the reprogrammed colonies like normal human ESC colonies and passage, expand, and maintain them using standard culture procedures until you have frozen cells from two 60-mm plates.

6. Generating Vector-Free iPSCs

1) Protocol for generating vector-free iPSCs

        a. When passaging iPSC colonies, prepare duplicate plates; one for immunostaining and one for further passaging.

        b. Perform immunostaining on one plate using anti-SeV antibodies (see below).

        c. If any colonies stain positive, perform cell cloning on the other duplicate plate.

        d. Repeat immunostaining with anti-SeV antibodies on the cloned colonies until all colonies in a plate are negative.

        e. If all colonies are negative for anti-SeV antibodies, passage the cells and confirm the absence of the CytoTune™ Sendai reprogramming vectors by RT-PCR.

2) Immunocytochemistry with Anti-SeV Antibodies

        a. Wash cells once with DPBS

        b. Fix the cells in 4% paraformaldehyde for 5 minutes at room temperature.

        c. Wash cells twice with DPBS.

        d. Add the anti-SeV antibody (MBL, Cat. no PD029) diluted in 0.1% Triton® X-100 in DPBS to the cells and incubate for 1 hour at 37°C.10

        e. Remove the antibody solution. Wash the cells 3 times with DPBS.

        f. Add the secondary antibody diluted in 0.1% Triton® X-100 in DPBS and incubate for 1 hour at 37°C.

       g. Remove the secondary antibody solution from the dish. Wash the cells 3 times with DPBS.

       h. Visualize the cells under a fluorescence microscope.

3) RT-PCR Protocol for Detecting the SeV Genome and Transgenes

       a. Extract the total RNA from 5 × 10⁶ iPSCs using the TRIzol® Reagent following the instructions provided with the reagent. As a positive control, use cells set aside at the last step of the reprogramming procedure.

       b. Carry out a reverse transcription reaction using 1 µg of RNA (from step 1, above) and the SuperScript® VILO™ cDNA Synthesis Kit following the instructions provided with the kit.

Note: Because the CytoTune™ Sendai reprogramming vectors are based on SeV, which is an RNA virus, reverse transcription is required for detecting the presence of the SeV genome in your reprogrammed cells.

       c. Carry out the PCR using 10 µL of cDNA from the reverse transcription reaction (step 2, above) and AccuPrime™ SuperMix I with the parameters below. For the RT-PCR primer sequences and the expected product size.

提问
扫一扫
丁香实验小程序二维码
实验小助手
丁香实验公众号二维码
关注公众号
反馈
TOP
打开小程序