Cell Isolation Techniques
互联网
| C ell I solation T echniques |
Methods and MaterialsWorking With EnzymesAll of the enzymes Worthington offers for tissue dissociation applications are available as lyophilized powders for convenience, versatility, and stability. As such they may be stored at 2 - 8°C, and they can be shipped without special handling. While lyophilization makes shipping and storing the enzymes easier, special care is required when opening any of the vials. Lyophilized proteins tend to be very hygroscopic so they should not be opened in humid areas. Be sure that any vial has been brought to room temperature before opening. Ideally, the vials should be taken from the refrigerator at least a half hour before opening, and they should be left in a dessicator. Before opening any of the vials, be sure it is not at all cool to the touch. All of the cell isolation enzymes cited in this section can be repeatedly warmed to room temperature and then returned to the refrigerator as long as these precautions are followed. Once diluted with media or buffer, proteolytic enzymes can undergo autolysis. Dissolve enzymes immediately before use. Special care must be taken with deoxyribonuclease (DNASE). This product is very prone to shear denaturation. Mix gently. Reconstituted enzymes should not be stored at 2 - 8°C. If necessary they can be aliquoted and frozen at -20°C. Avoid repeated freeze-thaw cycles. All enzymes, upon reconstitution, can be sterile filtered through a 0.22 µm pore size membrane. Generally most of the enzymes used in cell isolation procedures (except trypsin) can be directly dissolved in a balanced salt solution or buffer of choice. Stock solutions of trypsin should be made initially by reconstituting the enzyme in 0.001 N HCl. This solution can be diluted into the digestion medium or buffer immediately prior to use. The compilation of standard balanced salt solutions with their references found in the following table can be helpful in selecting an appropriate dissociation solution.
Basic Primary Cell Isolation Protocol(Refer to references for application specific parameters)
Perfusion procedures require special equipment and techniques for recirculating the buffers, media and enzymes. Please refer to referenced texts for additional information and guidance. Equilibration with 95%O2 :5%CO2In many cell isolation procedures it is important to the survival of the tissue during dissociation that the incubation medium be both well oxygenated and buffered at physiological pH. Both requirements are satisfied when the medium is equilibrated with 95%O2 :5%CO2 . Several balanced salt solutions contain the pH sensitive indicator dye, phenol red. When it is red or purple in color, the medium is too alkaline. This sometimes occurs when the tissue is placed in the dissociation enzyme solution. Reequilibration with O2 :CO2 is usually necessary prior to incubation. Gas should not be bubbled directly into any solution containing protein. This can result in frothing and denaturation of the protein with loss of biological activity. Gas can be sterilized by passage through a 0.22 micron membrane filter or through a sterile fiber plug such as the cotton plug in a sterile Pasteur or volumetric pipette. While mixing the solution, pass O2 :CO2 continuously through the space above the liquid until color indicates pH 7.2-7.4. The balanced salt solution is often pre-gassed but should be equilibrated with sterile O2 :CO2 each time the bottle is opened. Buffered balanced salt solutions will usually maintain constant pH regardless of the degree of oxygenation/carbonation and as a result can be easier to work with. Certain cell types may be sensitive to particular buffer salts. The reference tables can be useful in selecting an appropriate balanced salt solution, buffer, or dissociation media for a specific application. Trituration(Cell dispersion through mild pumping action) This can be a crucial procedure. It serves to break up the tissue fragments following incubation in the dissociation mix. If done too vigorously, cells will be destroyed lowering viability; too weakly and tissue fragments will be left intact lowering yield. Gentle trituration, using a 10 ml pipette, constitutes filling and emptying the barrel at a rate of about 3.0 ml per sec. You can best determine a suitable rate for your tissue through trial and error. Avoid bubbling the cell suspension. Enzymatic Cell HarvestingMost non-malignant cells growing in vitro move about and divide until they form a monolayer one cell thick completely covering the surfaces of the culture vessel. Movement and proliferation normally cease when confluence is reached. Harvesting cells for study, processing or subculture requires dissociation and detachment of the monolayer. Limited treatment of the cell layer with the enzyme trypsin is the method most frequently applied. It was formerly thought that trypsin preparations simply hydrolyzed a proteinaceous adhesive bonding substance responsible for the tenacious attachment of cells to their substratum with the resultant detachment of the cells from the culture vessel. It is now felt that the mechanism of action of trypsin in cell harvesting is more complex. This section summarizes recent information on this subject. Cell Adhesion and HarvestingDuring interphase, fibroblast-like cells in culture are spread out on the substratum in a characteristic, spindle-shaped configuration. There are differences of opinion as to whether the actual areas of cell adhesion are distributed over most of the undersurface of the cell or are localized in relatively narrow patches near the cell margins, principally in the vicinity of ruffling activity. In either case, these areas of adhesion appear to be composed of clusters of attachment points, each about 1 µm in diameter. The individual attachment points are apparently the distal portions of a cell cytoskeleton structure bound to the substratum. Within minutes after subjecting cultured cells to cold temperatures, chelating agents or trypsin solutions, they change shape drastically by rounding up and blebbing. Electron micrographs show many long retraction fibers with a diameter of 0.25 - 0.5 µm running from the surface of the rounded cell body to enlarged, terminal bulb attachment points previously located on the flattened cell's undersurface. The cells remain attached to the substratum until the fibers are broken, either mechanically by tapping or shaking the culture vessel, or chemically by the continued action of chelators and/or trypsin. (Cold temperatures alone are sufficient for rounding up but not for detachment. These conditions also greatly diminish the entry of trypsin into the cell.) Soon after cell detachment from the surface of the culture vessel, and subculture into new vessels containing trypsin-free medium, cytoplasm flows into the broken retraction fibers and refills them. Within an hour the rounded cells begin to take on their characteristic shape. Trypsin for Cell HarvestingIn 1916, Rous and Jones used "the trypsin powders of Merck, Brubler and Kahlbaum" to digest the plasma clots in which living cells were growing in order to obtain a cell suspension for subculturing. Vogelaar and Erlichman in 1934 were the next researchers to utilize the digestive enzymes in a crude trypsin preparation to liquify the coagulated plasma in which human fibroblasts were growing prior to subculturing. Techniques using trypsin similar to those used today were introduced by Scherer, Syverton and Gey in 1953 to harvest the then newly cultivated HeLa cell strain for subculturing and biochemical analysis. These workers tested both recrystallized trypsin and NF 1:250 trypsin for cell harvesting and found that the purified trypsin was more potent and less toxic to cells. Nevertheless the NF 1:250 preparation was employed for routine harvesting simply because it was less expensive. Relatively crude pancreatic preparations like NF 1:250 trypsin are still used today for cell harvesting in spite of the fact that they exhibit considerable lot-to-lot variability and contain extraneous substances and other enzymatic activities. Impurities in crude trypsin can cause unnecessary damage to cells and a reduction of cloning efficiency. Use of higher purity crystalline trypsin can eliminate many of these difficulties. None of the contaminants present in the NF 1:250 materials appears to be essential for cell harvesting activity since purified trypsin is very effective for monolayer dissociation, and since crude NF 1:250 trypsin plus soybean trypsin inhibitor is ineffective. McKeehan and Ham report markedly improved viability and multiplication potential to single cells in low serum medium when harvesting with crystalline trypsin at reduced temperatures, i.e., at 4°C. Cell Release ProcedureIn order to transfer or pass cells in monolayer culture from one culture vessel to another it is necessary to release cells from the monolayer into suspension so that they can be easily handled by pipetting and diluting. Releasing cells from the monolayer is almost always accomplished with purified trypsin by a procedure known as trypsinization. A usual trypsinization procedure is detailed in the inset below. Trypsinization Procedure
Some researchers have found that procedures using crystalline trypsin can provide increased viability in cells after they are released. Viability is usually determined by measuring cloning efficiency, i.e., the ability of a single cell to attach to the wall of a culture vessel and divide to produce a colony of cells which is visible to the naked eye after staining. Optimization TechniquesGeneral GuidelinesAlthough optimization of a cell isolation procedure for a particular cell type is dependent upon the adequate recovery of cells having various required characteristics, some guidelines can be established. The information in this guide regarding cell isolation and the enzymes used, when combined with logic and suitable experimental design, should lead to the development of a satisfactory cell isolation method. ( See Freshney 1987 for a detailed discussion. )
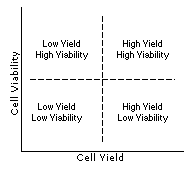
The complex relationship between cell yield and viability can be represented by the simplified illustrations shown on the left. In general there is an area of optimized recovery balanced between yield and viability; working near the middle of this range will reduce variability in the results of the cell isolation procedure. Understanding this relationship and how it can vary with a particular cell type and application, can make the optimization process easier.
For troubleshooting purposes various possible results, along with suggested corrective actions are listed below. Keep in mind that there are no clear lines between the quadrants but rather converging zones with variable areas of overlap.
A scale showing the relative digestive power of the enzymes commonly used follows for reference. Refer to this scale when troubleshooting a dissociation and planning isolation strategy. <center> <font><font><img alt="Enzyme Digestion Scale" src="http://img.dxycdn.com/trademd/upload/asset/meeting/2013/09/06/A1378381802.gif" /> </font> </font></center>Optimization StrategyReview the References of the Worthington Tissue Dissociation Guide for the particular tissue and cell type of interest, and then apply this information to the practical application of tissue dissociation. An example of a basic optimization strategy follows: Based upon the enzyme(s) cited, working concentrations and the buffer or media system used, set up proposed preliminary dissociation conditions similar to the closest available reference(s) listed in the tables. If a majority of the most similar referenced procedures cite the use of more than one enzyme, optimize the concentration of the primary enzyme (the one at the highest relative concentration) before adding the secondary enzyme(s). For example, if the two most similar references cite collagenase 0.1% with DNase 0.01% and collagenase 0.075% with hyaluronidase 0.025%, optimize the collagenase concentration empirically before evaluating the effects of either the hyaluronidase or the deoxyribonuclease. After optimizing the primary enzyme's concentration and incubation conditions evaluate any secondary enzyme(s). Initially vary the concentration of the primary enzyme approximately 50% relative to the referenced procedure(s). The above example of collagenase concentrations 0.1% and 0.075% suggests an evaluation of enzyme concentrations between 0.025% and 0.15%. The concentration increments should be evenly distributed to cover this entire range. As a result incremental concentrations of 0.025%, 0.05%, 0.075%, 0.10%, 0.125% and 0.15% would be indicated. To simplify the initial screening the middle of the range can be selected and, after evaluation of yield and viability results, a decision can be made regarding the need for further studies. In this case initial collagenase concentrations evaluated may be 0.05%, 0.075%, 0.10% and 0.125%. Historically, most tissue dissociation and cell isolation protocols have cited the enzyme concentration used in terms of weight per unit volume (w/v). More recently, however, some researchers have begun to use the enzymes on an activity basis, that is, units per milliliter (u/ml). Use either method but consider the advantages and disadvantages of each: a) The traditional weight per unit volume method most likely resulted from the use of cruder, partially purified mixtures of enzymes and is used independently of any specific or contaminating activities which may be present. With some of these crude preparations the lot-to-lot variation can be significant resulting in up to a two-fold difference in the amount of enzymatic activity added on a weight basis. b) Adding by activity can result in a possible two-fold difference in the amount of weight added to a dissociation; however, normalizes the potency used based upon the primary activity for each lot. Both methods ignore the relative contaminant activity levels. Upon establishing a basic method, consider pre-sampling different lots of enzyme(s) to evaluate these factors and to select a lot of enzyme which has minimal effect upon the critical parameters of a specific application. Important : For accurate evaluation of a particular procedure's performance, cell yield and viability should be quantitated and compared. After optimizing basic dissociation and isolation conditions, the specific application parameters such as metabolic function(s) or receptor binding capability should also be evaluated. Based upon these results the method may be judged suitable for use or re-optimized for higher retention of native cellular charactaristics. Cell QuantitationIt is important to quantitate the results of each dissociation step in order to effectively evaluate each procedure. The use of a cell counting chamber (hemocytometer) for yield quantitation and the use of trypan blue for viability quantitation are recommended. The use of a hemocytometer for cell yield quantitation is outlined; however, newcomers to this procedure can refer to more detailed discussions ( see Freshney, Culture of Animal Cells, page 227 ). Required Supplies:
C = Ñ x 104where C = cells per milliliter Example: Count1 = 183 cells/mm2
C = 178.5 x 104 = 1,785,000 cells/ml Total yield = C x V = 1785,000 x 55 = 98,175,000 cells Note : For best results the cell density should be at least 105 cells per milliliter. Common errors occur by improper mixing of the cell suspension prior to sampling and/or by allowing the cells to settle in the pipet prior to loading the hemocytometer counting chamber. Avoid the counting of multiple cell aggregates; the presence of aggregates indicates incomplete dissociation which may require further optimization of the isolation parameters. A single cell suspension provides the best results. Measure of ViabilityOne of the simplest methods to approximate cell viability is the dye exclusion technique. This method utilizes an indicator dye to demonstrate cell membrane damage. Cells which absorb the dye become stained and are considered non-viable. Dyes such as trypan blue, erythrosin, and nigrosin are commonly used with trypan blue being the most common in preliminary cell isolation procedures. This procedure can be performed along with the cell counting procedure but cell density may require adjustment in order to obtain approximately 106 cells per milliliter. Procedure
Example Total Cells / 1 mm2 = 182
Note : Dye exclusion viability procedures tend to give high estimates of cell viability when compared to cell attachment or metabolic assays, but for optimization of cell isolation procedures trypan blue does provide a rapid estimate of dissociation performance in conjunction with yield quantitation. |


 10X objective, focus on the counting chamber grid lines. Adjust the contrast as needed to clearly see both the grid and the dispersed cells.